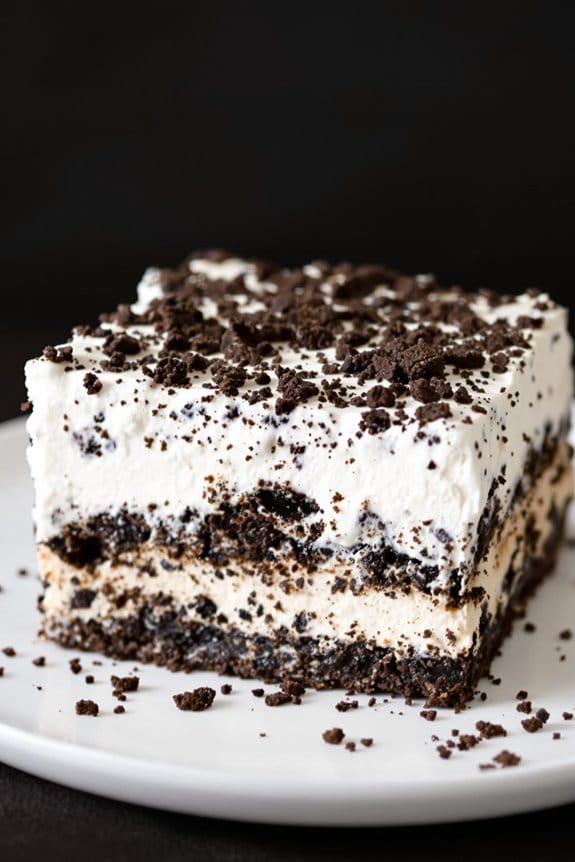
Have you ever tried your hand at making a No-Bake Cookies & Cream Lasagna? This dessert is not just a treat for the taste buds but is also a feast for the eyes, layering smooth, creamy fillings with crisp, chocolaty cookies all without turning on your oven. It’s surprisingly effortless, requiring only some assembly and a bit of patience as it chills. Perfect for when you need to whip up something impressive yet simple. Now, consider the options for customization—imagine adding a drizzle of caramel or a sprinkle of sea salt to elevate it. Curious about how these tweaks might transform the dish?
History
While the precise origins of No-Bake Cookies & Cream Lasagna remain unclear, its creation likely owes much to the popularization of no-bake desserts in the mid-20th century. During this era, you’d notice a surge in recipes championing convenience amid the bustling post-war lifestyle, as families sought quicker ways to prepare delightful treats without the fuss of traditional baking.
This dessert epitomizes the ingenuity of combining simple ingredients to produce a rich, textural experience that doesn’t require an oven. As culinary trends evolved, the dessert’s profile rose, finding resonance among home cooks who relished its ease and adaptability.
Essential to its widespread appeal was the accessibility of its components; crushed cookies, whipped toppings, and cream cheese form its base, items readily available in any supermarket. This ease certainly contributed to its spread across kitchens globally, tweaking to suit local tastes and available ingredients.
Its historical backdrop stirs up images of mid-century American kitchens, but its modern iterations reflect a global influence, bearing proof of the transformative power of culinary creativity. Life’s often too hectic for elaborate baking projects, and No-Bake Cookies & Cream Lasagna offers a perfect, scrumptious shortcut.
Recipe
Indulge in a dreamy slice of No-Bake Cookies & Cream Lasagna, a layered dessert that combines the beloved flavors of cookies and cream with the convenience of a no-bake treat. This dessert is perfect for gatherings, potlucks, or when you need a sweet fix without turning on the oven.
Its luscious layers of crushed cookies, creamy filling, and whipped topping will please crowds of all ages. The beauty of this dessert lies in its simplicity and the fact that it can be prepared ahead of time, making it a great option for busy days. Each layer melds together to create a symphony of textures and tastes that’s just as delightful on the eyes as it’s on the palate.
Whether it’s a special occasion or a regular weekday, this cookies & cream lasagna is sure to impress.
Ingredients:
- 36 Oreo cookies
- 1/4 cup of melted butter
- 8 oz cream cheese, softened
- 1/4 cup granulated sugar
- 2 tbsp cold milk
- 12 oz whipped topping, divided
- 2 cups of cold milk
- 1 package (3.9 oz) instant chocolate pudding mix
- 1 package (3.9 oz) instant vanilla pudding mix
- 1/2 tsp pure vanilla extract
- Extra crushed Oreos for garnish
Cooking Instructions:
Start by crushing the Oreo cookies into fine crumbs and blend them with melted butter. Press this mixture into the bottom of a 9×13 inch dish to form a firm base and refrigerate it to set.
In a mixing bowl, combine the softened cream cheese with granulated sugar and 2 tablespoons of milk until smooth, then fold in half of the whipped topping. Spread this mixture over the cookie crust.
For the next layers, whisk together the cold milk, chocolate pudding mix, vanilla pudding mix, and vanilla extract until thickened. Pour this over the cream cheese layer. Let it set slightly before spreading the remaining whipped topping over the top, smoothing evenly.
Garnish with extra crushed Oreos and chill for at least 4 hours, or ideally overnight, before serving.
Extra Tips:
Confirm all ingredients, especially the cream cheese, are at room temperature to guarantee smooth mixing and a lump-free cream layer.
For an even more intense cookie flavor, you can sprinkle extra crushed Oreos between each layer. When setting the layers, be patient; allowing each layer to set properly in the refrigerator will prevent them from mixing and will keep the layers distinct.
If you’re in a rush, placing the dish in the freezer can help speed up the setting times, but be sure to wrap it well to prevent freezer burn. Enjoy this decadent treat that’s sure to be a hit at any event!
Step 1. Layer Cookie Base
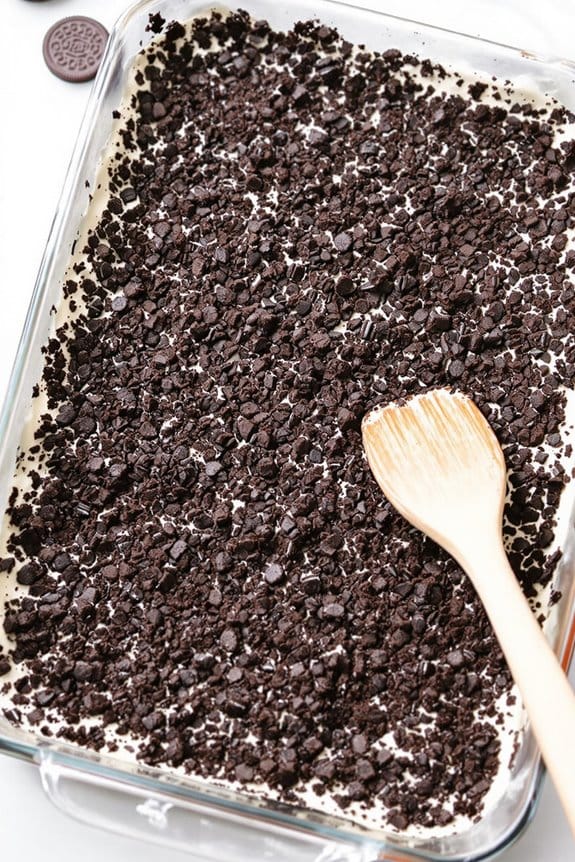
To kick off your No-Bake Cookies & Cream Lasagna, begin by crafting the essential layer cookie base. First, you’ll need to choose your cookies wisely; traditional options like chocolate sandwich cookies are perfect, thanks to their crisp texture and deep flavor. Crush them finely to guarantee the base is even and holds together nicely.
You can use a food processor or put them in a zip-lock bag and roll them with a rolling pin until they’re the right consistency.
Once your cookies are crushed, mix them with melted butter. This combo will be the glue that binds the base. The butter should be just enough to coat the crumbs but not so much that the base becomes greasy.
Mix them until the texture resembles wet sand.
Now, press this mixture firmly into the bottom of your chosen dish. It’s all about creating a solid foundation; so, don’t hesitate to really pack it down. Using the back of a spoon or the bottom of a cup can help smooth out and evenly distribute the mixture, guaranteeing a consistent thickness across the base.
This simple yet vital layer sets the stage for the layers to follow, making it an indispensable part of your dessert’s success.
Step 2. Add Creamy Filling Layer
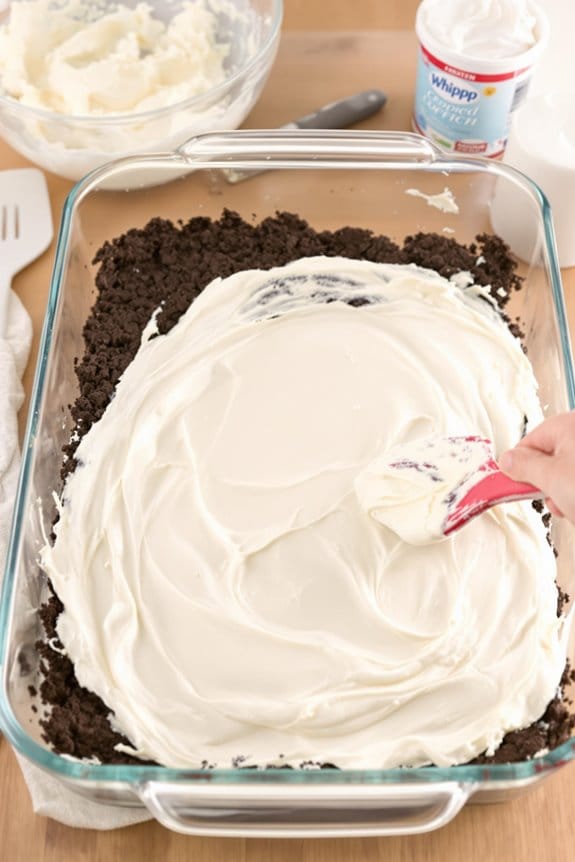
Now that you’ve pressed down your cookie base, it’s time to prepare the creamy filling that gives this dessert its luxuriously smooth texture. For this layer, you’ll need a mixture of softened cream cheese, powdered sugar, and vanilla extract.
Start by beating the cream cheese in a large bowl until it’s fluffy; this guarantees your filling is smooth without any lumps. Gradually add the powdered sugar while continuing to beat the mixture. A tip to maintain consistency: add the sugar in increments, thoroughly mixing between each addition.
Next, fold in some whipped topping with a spatula, gently incorporating it to keep the airiness intact. This step is essential as it makes the filling light yet rich.
Once you have a uniform mixture, stir in the vanilla extract, which adds that delightful hint of flavor enhancing the overall sweetness of your lasagna.
Now spread this creamy blend evenly over your cookie base using the spatula. Take care to cover the base completely, smoothing the top as evenly as possible.
This creamy layer works wonders, marrying the crisp base with the velvety texture, setting the stage for the next delicious layer. Your no-bake lasagna is now halfway to being a crowd-pleaser!
Step 3. Sprinkle Crushed Cookies Evenly
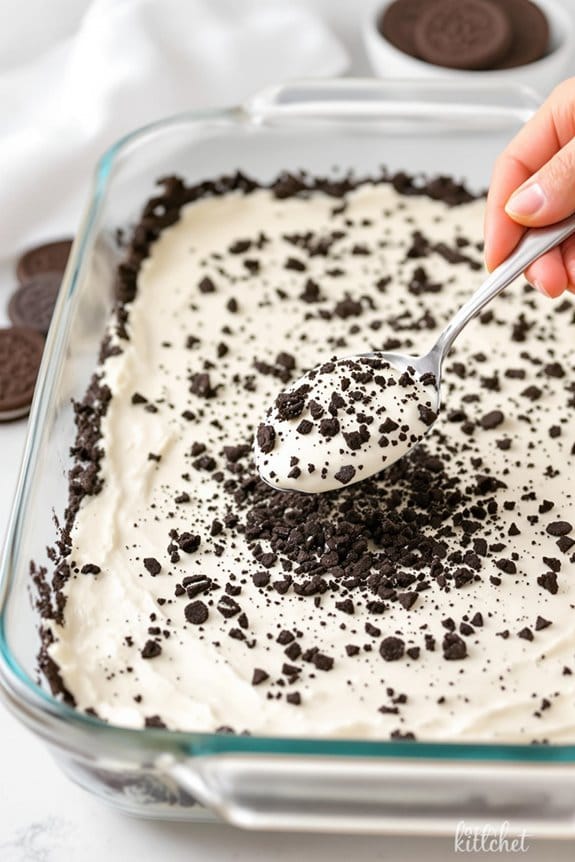
As you’ve finished smoothing the creamy layer, grab a handful of crushed cookies next. Evenly distribute them over the surface, guaranteeing that no spot is left barren. The cookies add a delightful crunch that contrasts beautifully with the lush cream below.
It’s important to guarantee an even layer; otherwise, you might end up with patches that are too soggy or too crisp, which could spoil the exquisite balance of textures in your lasagna.
Pour the crushed cookies into your palm and sprinkle them from a height of about six to eight inches above the dish. This height helps to disperse the crumbs more evenly.
Rotate the dish slightly after each handful to cover all areas uniformly. If you notice any larger chunks among the crumbs, break them up with your fingers to maintain consistency.
Step 4. Chill to Set Layers
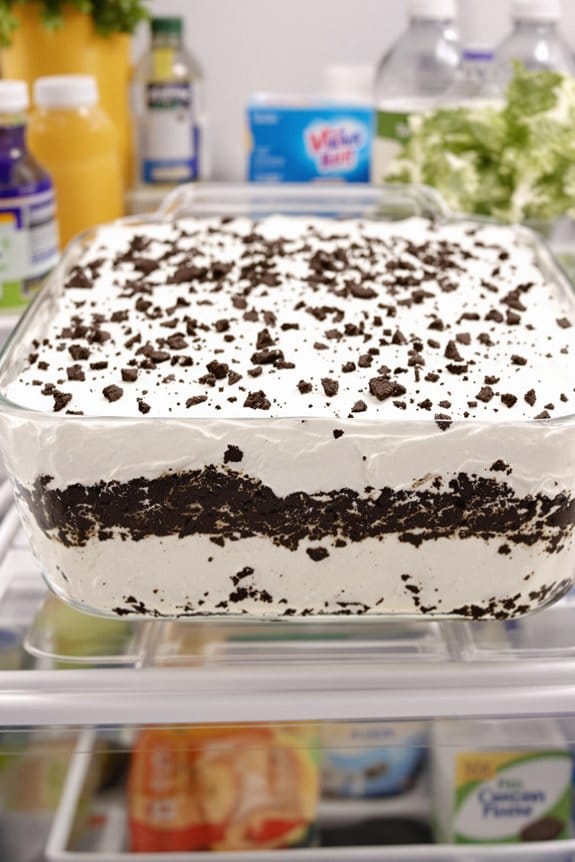
After you’ve added the crushed cookies, it’s essential to let your lasagna set properly by chilling it in the refrigerator. This chilling process isn’t just a waiting game; it serves two vital purposes.
To begin with, the cold helps solidify the fat in the layers, making your dessert stable and easy to slice. In addition, it allows the flavors to meld together, enhancing the overall taste of your no-bake creation.
Now, you’ll want to cover your dessert pan loosely with plastic wrap or aluminum foil. Make sure it’s not too tight; you don’t want to smush those carefully layered textures.
Place the pan in the refrigerator and chill for at least 4 hours. However, for the best results, letting it sit overnight is ideal. This extended time helps every layer to firm up adequately and absorb the savory hints from the cream and cookies.
Step 5. Garnish With Chocolate Shavings
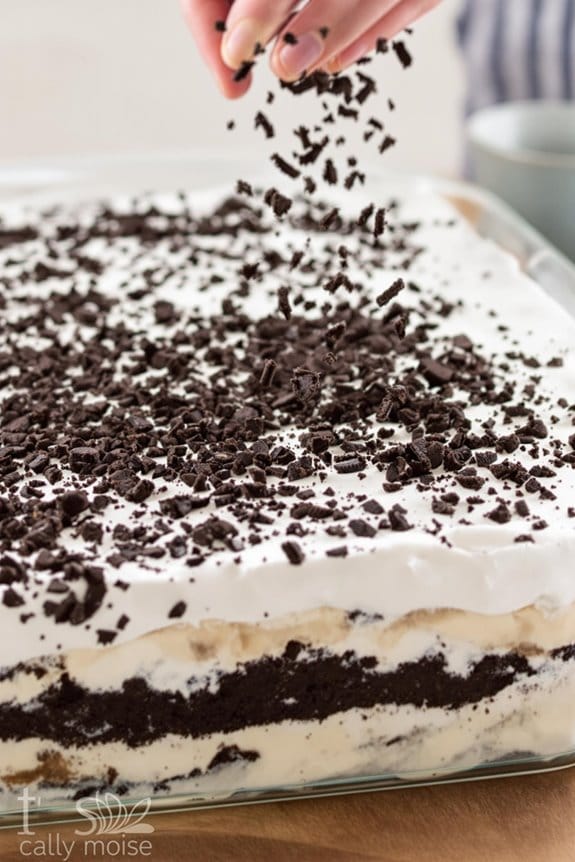
Once your cookies and cream lasagna has chilled thoroughly, it’s time to add the final touch: chocolate shavings. This simple embellishment not only enhances the visual appeal but also infuses a subtle richness that complements the creamy layers beneath.
To start, you’ll need a bar of high-quality semi-sweet or dark chocolate – the choice depends on how intense you prefer the chocolate flavor. Hold the bar with a paper towel to avoid melting from the warmth of your hands.
Using a vegetable peeler or a small, sharp kitchen knife, gently create thin shavings. If you’re using a peeler, position it at the top edge of the chocolate bar, applying light pressure as you slide it toward you.
Scatter the shavings evenly over the top layer of your lasagna. The idea is to cover it with a generous, yet not overpowering, layer of chocolate that will tantalize the taste buds without overwhelming the other flavors.
New Recipe
- Pepperoni and Hot Honey PizzaTry the tantalizing twist of pepperoni pizza with hot honey, where sweet meets heat—how will it transform your taste buds?
Cooking Tips
When making No-Bake Cookies & Cream Lasagna, you’ll find these cooking tips indispensable. First, confirm your ingredients are at room temperature. This includes cream cheese, which blends smoother and avoids lumps. You’d want a silky filling, wouldn’t you?
Next, for the cookie layers, don’t hesitate to double up on the cookies if you prefer a crunchier texture. It’ll give your lasagna that extra yummy bite. Be mindful when pressing the cookies into your pan; firm enough to create a stable base, yet gentle so it doesn’t turn into crumbs.
Now, when layering, consistency is key. You’ll want to spread each layer evenly. This prevents uneven pockets of ingredients, guaranteeing every bite is as good as the last.
When spreading the cream mixture, use a flat spatula and take your time to smooth it out carefully.
Lastly, let your dessert sit in the fridge for at least 4 hours before serving. This is vital as it sets the dessert perfectly, preventing it from being too soft or runny when you cut into it. Patience is a virtue here, and it pays off with the perfect creamy texture.
Final Thoughts
Having explored various tips on creating a delectable No-Bake Cookies & Cream Lasagna, let’s turn our focus to final considerations.
First off, remember that the quality of your ingredients directly impacts the taste of your final product. Opt for high-quality cookies and fresh cream—these subtle choices make a big difference.
You’ll find it’s simply fascinating how no-bake options open a world where convenience doesn’t sacrifice flavor; this lasagna is a prime example.
Keep in mind, the chilling time is essential. Don’t rush it. The layers need to set properly to achieve that perfect creamy, crumbly texture you’re aiming for.
Should you encounter any layers sliding or not setting correctly, don’t fret! Often, a little more chilling time or adjusting the cream’s consistency can fix these issues.
Experimenting slightly with the cream-to-cookie ratio can also yield your perfect balance between sweet and crunchy.
This dish isn’t just about the eating—it’s about the experience. Preparing it with friends or family adds to the enjoyment, turning simple cooking into cherished memories.
Trust that you’re not just layering cookies and cream; you’re building moments, slice by heavenly slice. Enjoy your culinary adventure and relish each bite!

